The Pro theme's Web Conference feature enables real-time virtual meetings and conferences with others. You can create audio-only calls or conferences, audio and video, and even instant messaging/text-chat meetings. There are screen sharing options so that you can display a browser tab, a window, or even your entire screen to other conference attendees. Files can be uploaded during the conference for others to download, and you can record any conference that you start (everyone will be notified when it is being recorded). When a conference ends, you can go to your Conferences History page to find links to download the recording, any files that were uploaded, and review a transcript of any chat messages that were sent.
For users who share your organization's domain (you each have an @example.com email address), you can see each other's online status and start a call with one click. In some cases, you may also be able to use that quick call feature with members of other domains, as long as they share your organization's email system. But even when you don't share the same domain or email system, you can still use the New Conference and Schedule Conference options to invite both local and "external" users to conferences; it will just take external users slightly longer to join. They will receive an email with a special link that allows them to join the conference after entering a verification code that they will receive via email. The New/Schedule Conference options also allow you to set up more complex conferences, with multiple attendees, moderator tools, password requirements, advance scheduling, and more.
Getting Started
Online Status
On the Pro theme toolbar, the Web Conference icon displays your current online status for conferences: ![]() Online,
Online, ![]() Away,
Away, ![]() Do Not Disturb,
Do Not Disturb, ![]() Invisible, or
Invisible, or ![]() Offline. Click the icon to see a drop-down list that you can use to change your status. Click Open Web Conference to open the Web Conference page in a separate window, for answering calls and managing your web conferences.
Offline. Click the icon to see a drop-down list that you can use to change your status. Click Open Web Conference to open the Web Conference page in a separate window, for answering calls and managing your web conferences.
![]()
Call Notifications and Answering Calls
When you are working in Webmail's Pro theme and there is an incoming call, the Web Conference icon will pulse and sound a chime.
![]()
![]()
Click the icon, and click Open Web Conference to open the Web Conference page for dealing with the call. You then have four options: Answer call with video and audio, Answer call with audio only, Join Conference (neither video nor audio will be active, but you can use the Chat options), or Decline Call. After the call is in progress, you can still enable/disable your camera or audio normally; you aren't limited by the way you chose to answered the call.
Making Calls and Starting Conferences
See One Click Calling below for information on starting calls, and see Starting a New Conference and Scheduling a Conference for information about starting and managing conferences.
Ending Calls and Leaving Conferences
To leave a conference, click the End Call icon at the bottom of the Web Conference page.
![]()
Web Conference Page
Toolbars
![]()
The top toolbar on the Web Conference page contains options for starting a new conference and scheduling one in advance. It also contains a link to this online help, a link to choose your audio and video settings, and a link to close the page.
![]()
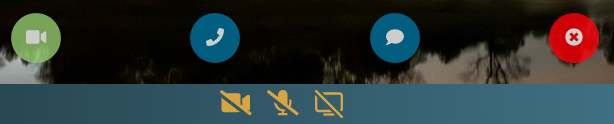
The page's bottom toolbar contains tools related to viewing and participating in your calls and conferences. On the left there is a show/hide Contacts icon, for displaying your list of Web Conference contacts. On the right, there is show/hide Chat icon for opening the Chat and Attendees window. There is also a Conferences History icon to display a list of your recent conferences (this icon isn't available while a conference is in progress). In the center of the toolbar are icons for turning on/off your Camera, Microphone, and Screen Sharing feature. When an icon is grayed out, that option isn't available to you, such as when audio or video is disabled by a conference moderator, or when you do not have a camera for sending video. When you click an icon, its appearance will change to indicate that feature is on or off.
Checking Your Media Settings
Click the ![]() Media Settings icon on the top toolbar to test and select your video and audio devices. You can test your devices and choose which microphone to use for audio input and which speakers to use for audio output. If you cannot access your devices, check your browser's privacy settings to ensure it has permission to use them.
Media Settings icon on the top toolbar to test and select your video and audio devices. You can test your devices and choose which microphone to use for audio input and which speakers to use for audio output. If you cannot access your devices, check your browser's privacy settings to ensure it has permission to use them.
One Click Calling
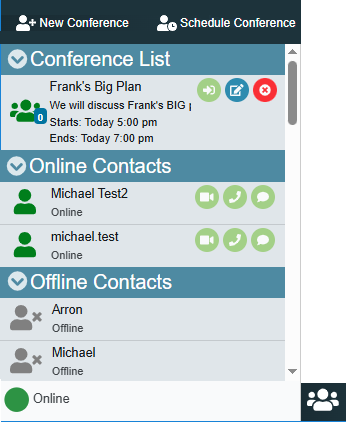
Use the show/hide Contacts icon to open your list of contacts on the left. There you will see all of your online and offline contacts listed, and a list of any conferences to which you have been invited. You can start a video or audio-only call with one click, by clicking the desired icon next to any online contact. The initial state of your camera or microphone when the call connects depends on which icon you choose. If you wish to start the call with neither turned on, choose the chat icon to start the call. After the call connects, you can enable/disable your camera or microphone normally; you aren't limited by the way the call started. When there is a conference in your Conference List that is active and ready to join, you will see a Join Conference icon that you can click to join it.
Starting a New Conference
To start a new conference with more options than a one-click call:
1.Click ![]() New Conference at the top of the Web Conference page. This will open the Invite Contacts To New Conference page.
New Conference at the top of the Web Conference page. This will open the Invite Contacts To New Conference page.
2.Under Your Sharing Status, click any of the three available icons: Audio, Video, and Screen. This specifies which of those things you wish to be active when the conference starts. If you enable Screen, then you will be asked to choose which tab, window, or screen to share after you click Start Conference in the last step.
3.Click Enable Moderator Tools if you wish to control which conference features attendees can use, and to control various aspects of the conference while it is in progress, such as being able to mute attendees.
4.If you enabled Moderator Tools, choose which Attendees Permissions to grant. For example, if you disable Video, then no regular attendees will be able to activate their camera during the conference. Only you, Moderators and Presenters will be able to do so.
5.Click the ![]() Add From Contacts icon, select the contacts you wish to add, and click Save. Alternatively, type an address in the Invite Contacts box and click the
Add From Contacts icon, select the contacts you wish to add, and click Save. Alternatively, type an address in the Invite Contacts box and click the ![]() Add Address icon.
Add Address icon.
6.Click Start Conference. Webmail will send an email invite to all attendees, with a link to join the conference. All online attendees will also receive an incoming call alert that they can answer if they choose.
Scheduling a Conference
To schedule a web conference in advance:
1.Click ![]() Schedule Conference at the top of the Web Conference page. This will open the Schedule a Conference page.
Schedule Conference at the top of the Web Conference page. This will open the Schedule a Conference page.
2.Give your conference a Title.
3.Click the calendar icon in the From field to select a date and time for the conference to begin.
4.In the Duration field, use the drop-down list to choose how long the conference will last; it can be from 10 minutes to 6 hours. The conference room will be available for this amount of time, even when no one is in it. Any attendees can join and leave at will during this time.
5.(Optional) Give a description of the conference. This will be included in the invites sent.
6.(Optional) Create a password for the conference. This is a visible password that will be included in the invites sent to the attendees; they must enter this word when joining the conference. Leave this field blank if you do not wish to require an entrance password.
7.Click Invite only if you wish to allow only those who received an invite to join. This prevents users from being able to enter the conference when they have somehow obtained the join link but weren't actually invited to the conference. This is the best way to control attendance and privacy in conferences with lots of attendees. Note: For external attendees, this will require them to use the same email address to receive their verification code that was used for the conference invitation email.
8.Click Enable Moderator Tools if you wish to control which conference features attendees can use, and to control various aspects of the conference while it is in progress, such as being able to mute attendees.
9.If you enabled Moderator Tools, choose which Attendees Permissions to grant. For example, if you disable Video, then no regular attendees will be able to activate their camera during the conference. Only you, Moderators and Presenters will be able to do so.
10.Click the ![]() Add From Contacts icon, select the contacts you wish to add, and click Save. Alternatively, type an address in the Invite Contacts box and click the
Add From Contacts icon, select the contacts you wish to add, and click Save. Alternatively, type an address in the Invite Contacts box and click the ![]() Add Address icon.
Add Address icon.
11.Under Select Moderators, choose any attendee that you wish to make moderators for the conference. Moderators will be able to modify permissions for everyone except you (the default admin of the conference) and Presenters.
12.Click Schedule Conference. Webmail will send an email invite to all attendees, with a link to join the conference, and the conference password (if required).
Using Conference Chat
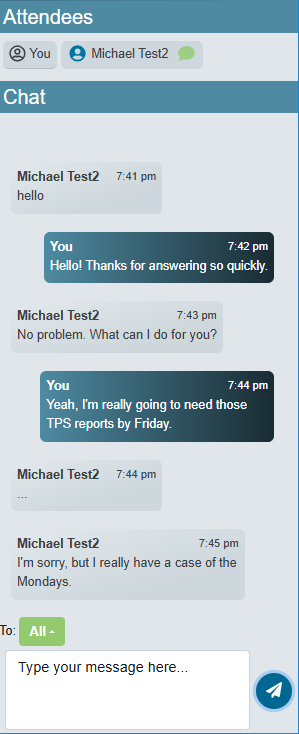
Click the Chat icon on the bottom toolbar to open the Chat and Attendees window. The Attendees section at the top (which you can click and drag to resize) contains a name and icon for each attendee currently in the conference. The icon identifies whether the person is an ![]() Attendee,
Attendee, ![]() Moderator,
Moderator, ![]() Presenter, or
Presenter, or ![]() Admin. By default, the To: option is set to "All", so that any message you type will be sent to every attendee's chat window. If you wish to send a private message to an attendee, click the All icon and then select the desired attendee. Alternatively, you can click the attendee's
Admin. By default, the To: option is set to "All", so that any message you type will be sent to every attendee's chat window. If you wish to send a private message to an attendee, click the All icon and then select the desired attendee. Alternatively, you can click the attendee's ![]() group chat icon to switch to private chat
group chat icon to switch to private chat ![]() with the attendee.
with the attendee.
Sharing Files in a Conference
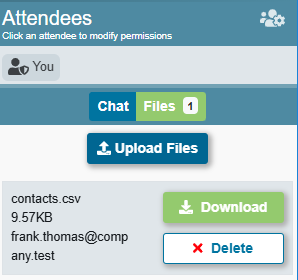
When you are in a web conference, you can upload files for other attendees to access while in the conference; each attendee will see a download link for each file you upload. Later, they can access those same download links from their Conferences History page.
To upload a file to a conference:
1.Join a conference.
2.Click Files in the Chat window.
3.Click Upload Files.
4.Choose a file, and click Open.
To download a file in a conference:
1.Click Files in the Chat window.
2.Locate the desired file that was uploaded to this conference, and click Download.
3.Choose a Save As location, and click Save.
Screen Sharing
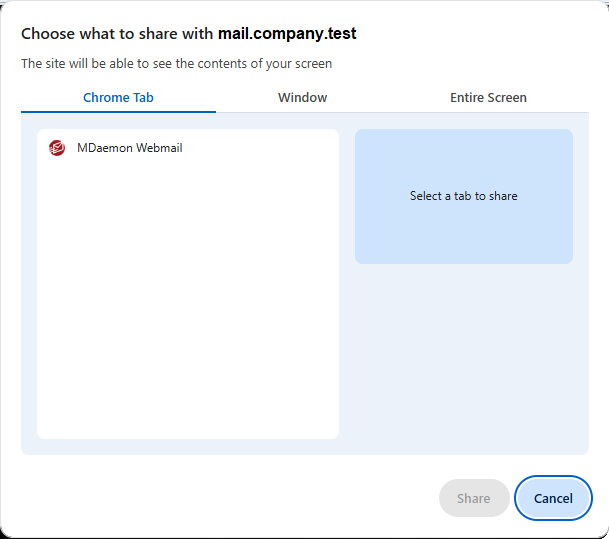
When you choose to activate the Screen Sharing option, a page will open for you to choose which browser tab, window, or entire screen to share. First click Tab, Window, or Entire Screen. Next, click the specific tab, window, or screen to share. Then, click Share. The selected item will then be shared to the conference. If your Video option is also active, a small picture-in-picture broadcast from your camera will appear near the bottom of your shared screen. If you click the toolbar's Screen Sharing icon again, it will toggle back and forth between sharing your screen and displaying your full video. To stop sharing your selected item, click the Stop Sharing button that appears in the tab you shared, or near the taskbar if sharing a window or screen.

Recording a Conference
This optional feature allows conference creators and administrators to record web conferences. If you create and join a conference when this feature is available, you will see a Record Conference option on the left side of the conference page's top toolbar. When you click that option to start recording, all attendees with be notified that the conference is being recorded. You can start, stop, pause, and resume recording at any time during the conference. Download links for conference recordings will be made available on each attendee's Conferences History page shortly after the conference ends.


Conferences History
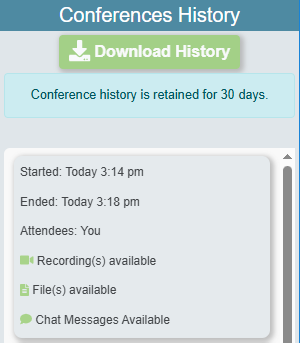
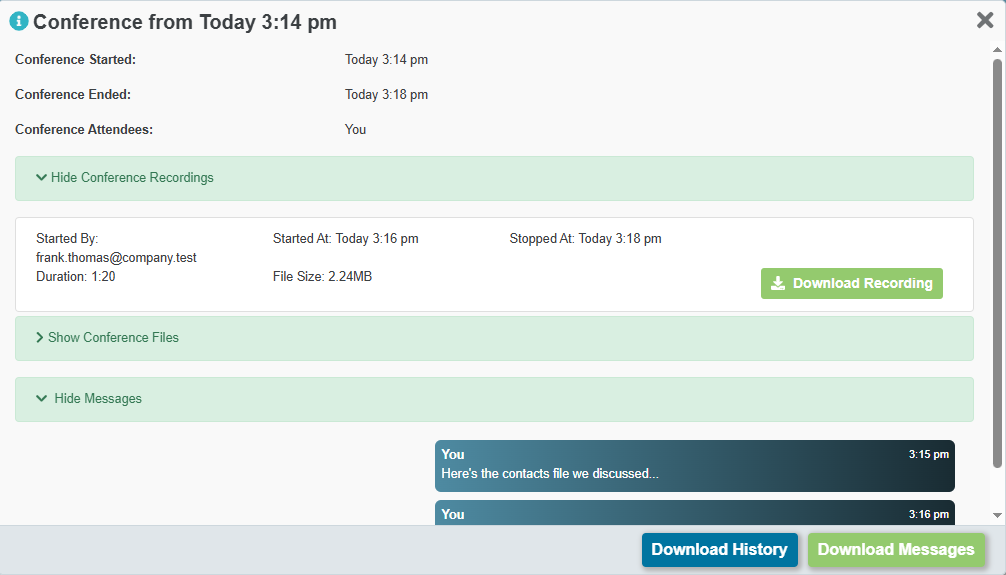
When not actively in a web conference, click the Show Conference History icon on the bottom toolbar to open the Conferences History window. This displays an entry for each web conference you have attended. Each entry lists the day and time the conference started and ended and who attended it. It also contains sections for Recordings, Conference Files, and Messages. The Recordings section contains the details of any recordings of the conference (e.g. start time, duration, size) as well as links to download the recordings. The Conference Files section contains the name, size, and sender of each file uploaded during the conference, and a download link for each one. The Messages section displays all chat messages that were sent during the conference.
Presenters, Moderators, Creators and Admins
When you start a call (or a conference without enabling Moderator Tools) every participant is a regular attendee. All features are active for everyone, without any moderation tools or limitations. When you create a conference with Moderator Tools, however, this introduces several roles that participants can play in the conference: Presenters, Moderators, Creators and Admins.
|
These settings only apply to local users. External users, those who join conferences from outside addresses, cannot be Presenters, Moderators, or Admins. |

Presenters
Presenters are special attendees who cannot have their Audio, Video, Screen Sharing, or Chat disabled, even by a Moderator.
Moderators
Like Admins described below, Moderators have control over the Conference and Attendee Permissions, but their level of control over those things is determined by the Admin.
Requesting a Status Change
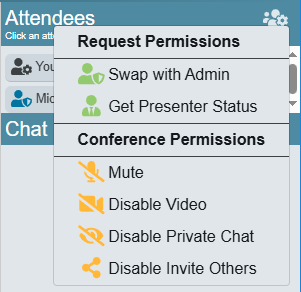
Anyone but an Admin can request a Status change, to be made a Presenter, Moderator, or promoted to Admin. The Admin can then grant or deny the request. To request a status change:
1.Click the ![]() Permissions icon beside the Attendees heading in the Chat window.
Permissions icon beside the Attendees heading in the Chat window.
2.Depending on your current status, click Get Moderator Status, Get Presenter Status, or Swap with Admin.
Creators and Admins
When you start a conference (with or without Moderator Tools), you are the conference Creator. Only you can delete the conference and edit its settings when outside of the conference. When Moderator Tools are enabled, you are also the conference's default Admin. As the Admin, you have complete control over the conference while you are in the room. You can enable/disable the conference permissions and individual attendee permissions, and you can mute/unmute attendees' audio and video at will. You can also grant Moderator and Presenter status to any attendees, or remove it. When you are not in the room, a moderator will be automatically set to Admin until you join. If no moderator is present, any attendees will still be able to participate with whatever settings and permissions you set when you created the conference. Finally, you can also transfer your Admin status to someone else if you choose.
Granting or Denying a Status Change Request
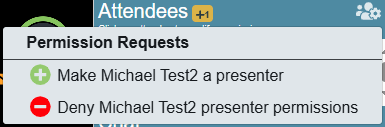
When someone uses one of the Request Permissions options to request to be given Moderator or Presenter Status, or to request to Swap with Admin, the Admin will receive a notification. To grant or deny the request:
1.Click the Notification icon in the Attendees section of the Chat window.
2.Click Make... or Deny... to grant or deny the request.
3.If it was a request to Swap with Admin, click Yes or No to confirm the decision.
Modifying Conference Permissions
To modify a conference permission for all regular attendees (does not apply to Moderators and Presenters):
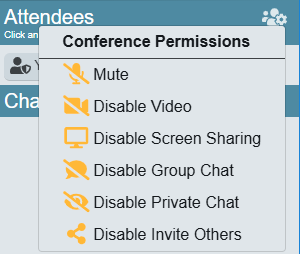
1.Click the ![]() Conference Permissions icon beside the Attendees heading in the Chat window.
Conference Permissions icon beside the Attendees heading in the Chat window.
2.Click the option you wish to enable or disable.
Modifying an Attendee or Moderator's Permissions or Options
To modify an individual attendee or moderator's permissions or options:
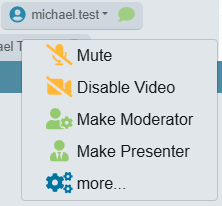
1.Click the user's name in the Attendees section of the Chat window.
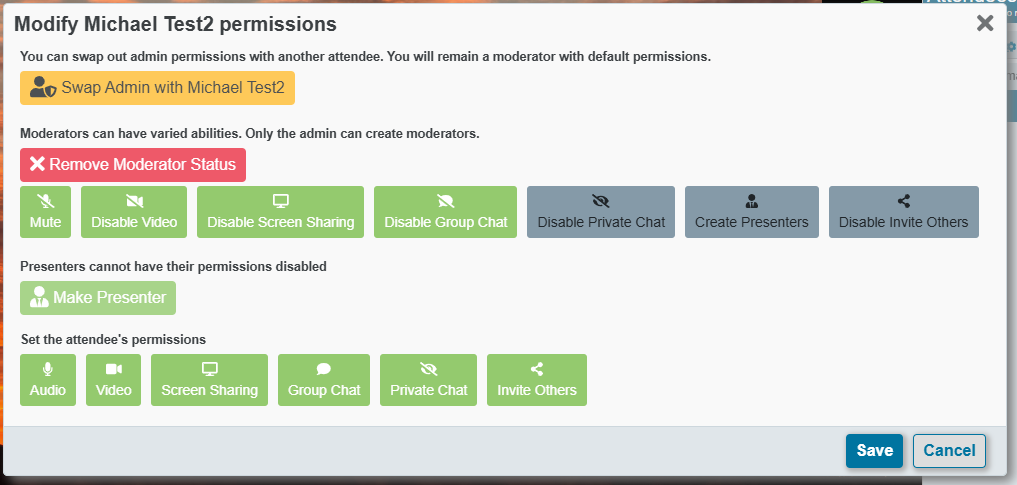
2.Click the permission or option you wish to enable or disable. You can enable/disable audio or video, make someone a Moderator, or make someone a Presenter. If you are looking for a different option to modify, click more... to open the Modify Username Permissions page.
3.If you clicked more... in Step 2, make any desired changes, and click Save.
Transferring Admin Status
To transfer your Admin status to someone else:
1.Click the user's name in the Attendees section of the Chat window.
2.Click more... to open the Modify Username Permissions page.
3.Click Swap Admin with Username.
4.Click Yes.