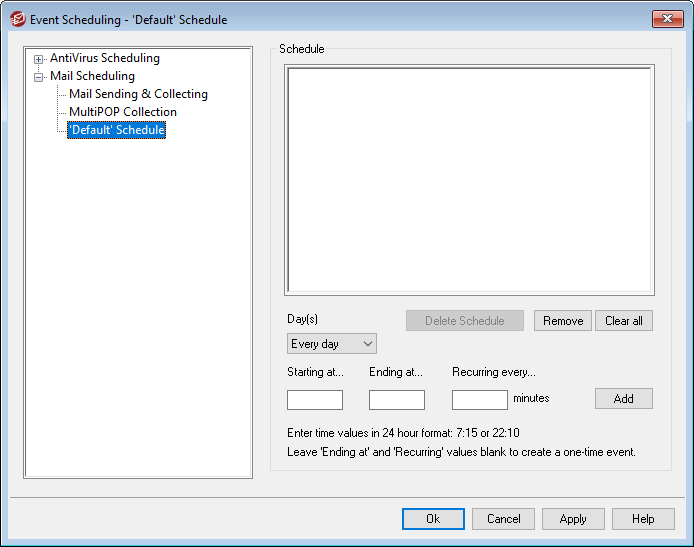
Each Mail Schedule corresponds to the schedule of the same name listed in the Name drop-down list on the Mail Sending & Collecting screen. Use each Mail Schedule to designate the specific times that remote mail processing will occur for that schedule. Mail Schedules are located at: Setup » Event Scheduling » Mail Scheduling » 'ScheduleName' Schedule.
Schedule
Delete Schedule
This button will delete the custom Mail Schedule. The schedule will be deleted and its entry will be removed from the Name drop-down list on the Mail Sending & Collecting screen. After you click this button, a confirmation box will open asking if you are sure you want to delete the schedule. This option is only available for custom schedules — the Default Schedule cannot be deleted.
Remove
To remove an entry from the list, select the entry and then click this button.
Clear all
This button removes all entries from the schedule.
Creating Schedule Events
Day(s)
When creating a new event for the schedule, first select the day or days on which this scheduling event will occur. You can select: every day, weekdays (Monday thru Friday), weekends (Saturday and Sunday), or specific days of the week.
Starting at...
Enter the time that you wish the event to start. The time value must be in 24 hour format, from 00:00 to 23:59. If you wish this to be a single event rather than recurring event, this is the only time value that you will enter (leave the Ending at... and Recurring every... options blank).
Ending at...
Enter the time that you wish the event to end. The time value must be in 24 hour format, from 00:01 to 23:59, and it must be greater than the Starting at... value. For example, if the Starting at... value were "10:00" then this value could be from "10:01" to "23:59". Leave this option blank if you wish it to be a single event rather than recurring event.
Recurring every [xx] minutes
This is the time interval at which mail will be processed between the designated Starting at... and Ending at... times. Leave this option blank if you wish it to be a single event rather than recurring event.
Add
Once you have designated the Day(s) and Starting at... time, and the optional Ending at... time and Recurring every... value, click this button to add the event to the schedule.
|
Depending on your needs, it may be sufficient to use the simple scheduling options on the Mail Sending & Collecting screen to control mail processing intervals. For example, it is pointless to make a specific schedule with events for every minute of every day when you can simply set the slider bar on Mail Sending & Collecting to one minute intervals and accomplish the same thing. On the other hand, if you want the processing intervals to be more than an hour apart, or only on certain days, then you can use some combination of the scheduling options and specific times. |
See:
